基本渲染概念
WARNING
Although Minecraft is built using OpenGL, as of version 1.17+ you cannot use legacy OpenGL methods to render your own things. Instead, you must use the new BufferBuilder system, which formats rendering data and uploads it to OpenGL to draw.
总的来说,您应该使用 Minecraft 自己的渲染系统,否则您就得使用更底层的 OpenGL 通用管线来达到目的。
本文将就 Minecraft 渲染系统对一些关键术语和概念进行解释。
尽管 Minecraft 的大部分渲染都通过 DrawContext 中的多种方法被抽象出来,且您很可能并不需要接触这里提到的任何内容,了解渲染的基础实现依然是重要的。
镶嵌器 Tessellator
镶嵌器 Tessellator 是 Minecraft 中用于渲染东西的主类。 它是一个单例,这意味着游戏中只有它的一个实例。 您可以通过 Tessellator.getInstance() 获取这个实例。
缓冲构建器 BufferBuilder
缓冲构建器 BufferBuilder 是用来将渲染数据格式化并上传到 OpenGL 的类。 它负责创建一个缓冲,其将随后上传到 OpenGL 用于绘制。
镶嵌器 Tessellator 负责创建一个缓冲构建器 BufferBuilder,用于将渲染数据格式化并上传到 OpenGL。 您可以通过 Tessellator.getBuffer() 来创建一个缓冲构建器 BufferBuilder。
初始化 BufferBuilder
在您能够向 BufferBuilder 写入任何数据前,您必须完成它的初始化。 这将通过调用 BufferBuilder.begin(...) 完成,它接受一个顶点格式 VertexFormat 参数和一个绘制模式参数。
顶点格式
顶点格式 VertexFormat 定义了我们在我们的数据缓冲中包含的元素,并规定了这些元素将如何被转发到 OpenGL。
可用的 VertexFormat 如下:
| 元素 | 格式 |
|---|---|
BLIT_SCREEN | { position (3 floats: x, y and z), uv (2 floats), color (4 ubytes) } |
POSITION_COLOR_TEXTURE_LIGHT_NORMAL | { position, color, texture uv, texture light (2 shorts), texture normal (3 sbytes) } |
POSITION_COLOR_TEXTURE_OVERLAY_LIGHT_NORMAL | { position, color, texture uv, overlay (2 shorts), texture light, normal (3 sbytes) } |
POSITION_TEXTURE_COLOR_LIGHT | { position, texture uv, color, texture light } |
POSITION | { position } |
POSITION_COLOR | { position, color } |
LINES | { position, color, normal } |
POSITION_COLOR_LIGHT | { position, color, light } |
POSITION_TEXTURE | { position, uv } |
POSITION_COLOR_TEXTURE | { position, color, uv } |
POSITION_TEXTURE_COLOR | { position, uv, color } |
POSITION_COLOR_TEXTURE_LIGHT | { position, color, uv, light } |
POSITION_TEXTURE_LIGHT_COLOR | { position, uv, light, color } |
POSITION_TEXTURE_COLOR_NORMAL | { position, uv, color, normal } |
绘制模式
绘制模式定义了数据是怎样用于绘制的。 可用的绘制模式如下:
| 绘制模式 | 描述 |
|---|---|
DrawMode.LINES | 每个元素由 2 个顶点构成,代表一条直线。 |
DrawMode.LINE_STRIP | 第一个元素需要 2 个顶点。 附加的元素只需要 1 个新的顶点就能绘制,创建出一条连续的线。 |
DrawMode.DEBUG_LINES | 与 DrawMode.LINES 类似,但线在屏幕上总是保持 1 像素宽。 |
DrawMode.DEBUG_LINE_STRIP | 与 DrawMode.LINE_STRIP 相同,但线总是保持 1 像素宽。 |
DrawMode.TRIANGLES | 每个元素都由 3 个顶点组成,形成一个三角形。 |
DrawMode.TRIANGLE_STRIP | 前 3 个顶点形成第一个三角形。 每个新增的顶点与前两个顶点形成一个新的三角形。 |
DrawMode.TRIANGLE_FAN | 前 3 个顶点形成第一个三角形。 每个新增的顶点与第一个顶点和最后的一个顶点形成一个新的三角形。 |
DrawMode.QUADS | 每个元素由 4 个顶点构成,形成一个四边形。 |
向 BufferBuilder 写入
BufferBuilder 初始化完成后,您就可以向它写入数据。
BufferBuilder 允许我们一个顶点一个顶点地构造我们的缓冲。 我们调用 buffer.vertex(matrix, float, float, float) 方法来添加一个顶点。 参数 matrix 是变换矩阵,具体细节我们将在后文中讨论。 3 个 float 参数代表顶点坐标的 (x, y, z)。
这个方法返回一个顶点构建器(vertex builder),我们可以用它来向这个顶点指定附加信息。 按照我们先前定义的顶点格式 VertexFormat 在附加这些信息时是至关重要的。 如果我们不这么做的话,OpenGL 将无法正确地解释我们的数据。 当我们构建完一个顶点后,我们调用 .next() 方法。 这将完成当前的顶点并准备好下一个顶点的构建器。
“剔除”的概念也值得我们理解。 剔除是从 3D 形状中移除那些在观察者视角不可见的面的过程。 如果一个面的顶点以错误的顺序被指定,这个面可能会因为被剔除而无法正确地渲染。
什么是变换矩阵?
一个变换矩阵是一个 4×4 的矩阵,用于变换一个向量。 在 Minecraft 中,变换矩阵只被用于变换我们传入顶点调用的坐标。 这些变换可以放缩,平移和旋转我们的模型。
它有时被称作位置矩阵,或模型矩阵。
它通常通过 MatrixStack 类获取,而 MatrixStack 实例可以从 DrawContext 对象获取:
java
drawContext.getMatrices().peek().getPositionMatrix();一个实际案例:渲染一个三角带
用实际案例来解释如何向 BufferBuilder 写入会更轻松一些。 不妨让我们尝试用绘制模式 DrawMode.TRIANGLE_STRIP 和顶点格式 POSITION_COLOR 来渲染一些东西。
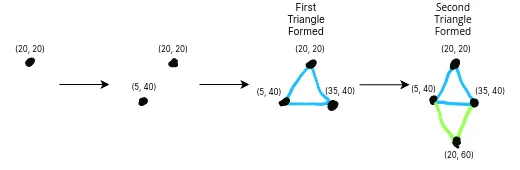
我们将在平视显示器(HUD)上的以下几个点按顺序绘制顶点:
txt
(20, 20)
(5, 40)
(35, 40)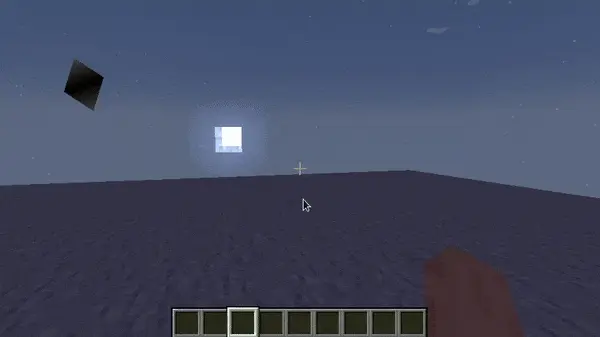
(20, 60)这应当给出一个漂亮的菱形——因为我们在使用绘制模式 TRIANGLE_STRIP,渲染器将执行以下几步:
因为在这个例子中我们在平视显示器(HUD)上绘制,我们将使用 HudRenderCallback 事件:
java
HudRenderCallback.EVENT.register((drawContext, tickDelta) -> {
	// Get the transformation matrix from the matrix stack, alongside the tessellator instance and a new buffer builder.
	Matrix4f transformationMatrix = drawContext.getMatrices().peek().getPositionMatrix();
	Tessellator tessellator = Tessellator.getInstance();
	BufferBuilder buffer = tessellator.getBuffer();

	// Initialize the buffer using the specified format and draw mode.
	buffer.begin(VertexFormat.DrawMode.TRIANGLE_STRIP, VertexFormats.POSITION_COLOR);

	// Write our vertices, Z doesn't really matter since it's on the HUD.
	buffer.vertex(transformationMatrix, 20, 20, 5).color(0xFF414141).next();
	buffer.vertex(transformationMatrix, 5, 40, 5).color(0xFF000000).next();
	buffer.vertex(transformationMatrix, 35, 40, 5).color(0xFF000000).next();
	buffer.vertex(transformationMatrix, 20, 60, 5).color(0xFF414141).next();

	// We'll get to this bit in the next section.
	RenderSystem.setShader(GameRenderer::getPositionColorProgram);
	RenderSystem.setShaderColor(1.0F, 1.0F, 1.0F, 1.0F);

	// Draw the buffer onto the screen.
	tessellator.draw();
});在平视显示器(HUD)上绘制的结果如下:
TIP
尝试给顶点随机的颜色和位置,看看会发生什么! 您也可以尝试使用不同的绘制模式和顶点格式。
矩阵栈 MatrixStack
在学习完如何向 BufferBuilder 写入后,您可能会好奇如何变换你的模型——或者甚至让它动起来。 这时就需要引入 MatrixStack 类。
MatrixStack 类有以下方法:
push()- 向栈压入一个新的矩阵。pop()- 从栈中弹出一个矩阵。peek()- 返回栈顶的矩阵。translate(x, y, z)- 对栈顶的矩阵做平移。scale(x, y, z)- 对栈顶的矩阵做放缩。
您也可以使用四元数对栈顶的矩阵做叉乘,这些内容包括在下一节中。
从我们上面的案例出发,我们可以用 MatrixStack 和 tickDelta(从上一帧到现在经过的时间)让我们的菱形放大和缩小。
WARNING
You must push and pop the matrix stack when you're done with it. If you don't, you'll end up with a broken matrix stack, which will cause rendering issues.
在您获取变换矩阵前请确保向矩阵栈压入一个新的矩阵!
java
MatrixStack matrices = drawContext.getMatrices();

// Store the total tick delta in a field, so we can use it later.
totalTickDelta += tickDelta;

// Push a new matrix onto the stack.
matrices.push();
// Scale the matrix by 0.5 to make the triangle smaller and larger over time.
float scaleAmount = MathHelper.sin(totalTickDelta / 10F) / 2F + 1.5F;

// Apply the scaling amount to the matrix.
// We don't need to scale the Z axis since it's on the HUD and 2D.
matrices.scale(scaleAmount, scaleAmount, 1F);

// ... write to the buffer.

// Pop our matrix from the stack.
matrices.pop();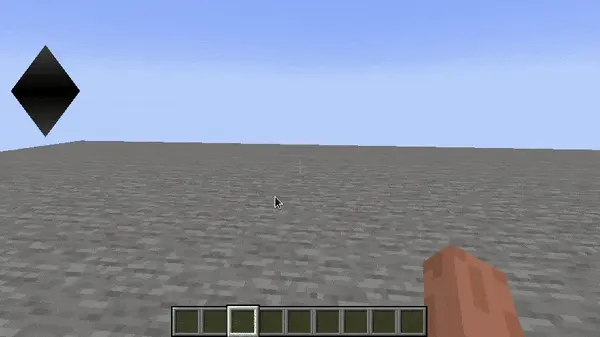
四元数 Quaternion(旋转物体)
四元数是三维空间中的旋转的一种表示。 通过 multiply(Quaternion, x, y, z) 方法,它们被用于旋转 MatrixStack 栈顶的矩阵。
您几乎不太可能需要直接使用 Quaternion 类,因为 Minecraft 在工具类 RotationAxis 中提供了许多预先定义的 Quaternion 实例。
不妨让我们尝试绕 z 轴旋转我们的菱形。 我们可以通过 MatrixStack 和 multiply(Quaternion, x, y, z) 方法来实现。
java
// Lerp between 0 and 360 degrees over time.
float rotationAmount = (float) (totalTickDelta / 50F % 360);
matrices.multiply(RotationAxis.POSITIVE_Z.rotation(rotationAmount));
// Shift entire diamond so that it rotates in its center.
matrices.translate(-20f, -40f, 0f);这会产生如下的结果: